Thursday, January 30, 2014

Web Site Optimization - Leverage browser caching using htaccess

If you set an expiry date or a maximum age in the HTTP headers for static resources, modern browsers will load previously downloaded static resources like images, css, javascript, pdf, swf etc. from local disks rather than over the network.
So if you configure your web server to set caching headers and apply them to all cacheable static resources, your site will appear to load much faster.
HTTP/S supports local caching of static resources by the browser. Some of the newest browsers (e.g. IE 7, Chrome) use a heuristic to decide how long to cache all resources that don't have explicit caching headers. Other older browsers may require that caching headers be set before they will fetch a resource from the cache; and some may never cache any resources sent over SSL.
To take advantage of the full benefits of caching consistently across all browsers, we recommend that you configure your web server to explicitly set caching headers and apply them to all cacheable static resources, not just a small subset (such as images). Cacheable resources include JS and CSS files, image files, and other binary object files (media files, PDFs, Flash files, etc.). In general, HTML is not static, and shouldn't be considered cacheable.
It is important to specify one of Expires or Cache-Control max-age, and one of Last-Modified or ETag, for all cacheable resources. It is redundant to specify both Expires and Cache-Control: max-age, or to specify both Last-Modified and ETag.
You can enable browser caching through web server params or .htaccess file in the root of your domain (for Apache based web server). Let's get an example with .htaccess entry as follows:
## EXPIRES CACHING ##

ExpiresActive On
ExpiresByType image/jpg "access 1 year"
ExpiresByType image/jpeg "access 1 year"
ExpiresByType image/gif "access 1 year"
ExpiresByType image/png "access 1 year"
ExpiresByType text/css "access 1 month"
ExpiresByType application/pdf "access 1 month"
ExpiresByType text/x-javascript "access 1 month"
ExpiresByType application/x-shockwave-flash "access 1 month"
ExpiresByType image/x-icon "access 1 year"
ExpiresDefault "access 2 days"

## EXPIRES CACHING ##

This basically instructs the browser to cache different static resources like images, javascript, flash, pdf, and icons for the specified period of time. You can increase or decrease the values depending on your specific requirements. The more static or unchangeable your resource, longer the period you can enable browser caching. You can read more about the Apache Module mod_expires and how generation of Expires and Cache-Control HTTP headers instruct the client about the document’s validity and persistence.

Monday, January 27, 2014

Login with Facebook Account to Website

Facebook Twitter Login
Starting is with create an APP for your site .

Note : You should log in to your Facebook account before moving ahead.

Go To https://developers.facebook.com/

Create an APP using the menu  APP appearing on developers toolbar on this page

   
The Following popup appears


 Fill in the details and CREATE APP

After this the APP dashboard appears .

The dashboard has the App Id


Though the app id is the only required field for login , in backend the process the URLs ie the domain url assigned to APP and that of the Facebook login invoking page .
So next step is to add the domain or Platform to the App. So move to the Settings Tab .
Theres the ADD PLATFORM . Click on it and the following popup appears . Click on website and add the url .


After being done with this , the following page is shown


We are done with the App Creation and hopefully you have noted down the App Id .


Now the second phase , The Facebook Login using javascript .
Create a page and add the following code to it , replacing the appId variable .

DownloadCode 


The output for this page is follows


The above is the data received from the facebook after the user is successfully Logged In .
The data can be used to register any user or display their information on our website . 

Database
Sample database users table columns id, email, oauth_uid, oauth_provider and username.

CREATE TABLE users
(
id INT PRIMARY KEY AUTO_INCREMENT,
email VARCHAR(70),
oauth_uid VARCHAR(200),
oauth_provider VARCHAR(200),
username VARCHAR(100),
twitter_oauth_token VARCHAR(200),
twitter_oauth_token_secret VARCHAR(200)
);

The tutorial contains three folders called facebook,twitter and config with PHP files.
facebook //Facebook OAUTH library
twitter //Twitter OAUTH library
config
-- functions.php 
-- dbconfig.php //Database connection
-- fbconfig.php //Facebook API connection
-- twconfig.php //Twitter API connection
index.php
home.php
login-twitter.php
login-facebook.php
getTwitterData.php

Facebook Setup
You have to create a application. Facebook will provide you app id and app secret id, just modify following code
fcconfig.php

define('APP_ID', 'Facebook APP ID');
define('APP_SECRET', 'Facebook Secret ID');
?>

Twitter Setup
Create a twitter application click here. Some like Facebook Twitter provide you consumer key amd consumer secret key using these modify following code.
twconfig.php

define('YOUR_CONSUMER_KEY', 'Twitter Key');
define('YOUR_CONSUMER_SECRET', 'Twitter Secret Key');
?>

dbconfig.php
Database configuration file.

define('DB_SERVER', 'localhost');
define('DB_USERNAME', 'User Name');
define('DB_PASSWORD', 'Password');
define('DB_DATABASE', 'DATABASE');
$connection = mysql_connect(DB_SERVER, DB_USERNAME, DB_PASSWORD) or die(mysql_error());
$database = mysql_select_db(DB_DATABASE) or die(mysql_error());
?>

login-twitter.php
In root directory find out the below line at login-twitter.php code and replace yourwebsite.
$request_token = $twitteroauth->getRequestToken('http://yourwebsite.com/getTwitterData.php');

index.php
If you want to modify your web project existing login or index pages, just use following code.

session_start();
if (isset($_SESSION['id'])) {
// Redirection to login page twitter or facebook
header("location: home.php");
}
if (array_key_exists("login", $_GET))
{
$oauth_provider = $_GET['oauth_provider'];
if ($oauth_provider == 'twitter')
{
header("Location: login-twitter.php");
}
else if ($oauth_provider == 'facebook')
 {
header("Location: login-facebook.php");
}
}
?>
//HTML Code
?login&oauth_provider=twitter">Twitter_Login

?login&oauth_provider=facebook">Facebook_Login

Friday, January 24, 2014

jQuery JSON example

Hi, today i am going to tell you about JSON (JavaScript Object Notation) before start work on json, we should know about JSON and how we use it, a JSON is lightweight data passing format and use to sending data as a web service file, before json, web developer's use XML to send data,  a json is very easy to write and readable, now i will show you a basic example on how to passing json data from client side.

JSON Syntax
the json is name/value pairs, json data separated by columns, you can put objects in curly braces and arrays in square brackets 
?   
// JSON

"name" : "lessoncup"

// JSON Object

{"name": "lessoncup", "title" : "lessoncup programming blog", "url": "www.lessoncup.com" }


// JSON Array

{
"Lessoncup": [{"name":"lessoncup"}, {"title":"lessoncup programming blog"}, {"url":"www.lessoncup.com"}]
}

Passing JSON data using jQuery
to display the json the using jquery, we use $.getJSON() method this method have three parameters

    url [ string ]
    data [ optional ]
    success [ optional ]


JSON Script
?  
{
 "name": "lessoncup",
 "title" : "lessoncup programming blog",
 "url": "www.lessoncup.com"
}

jQuery Script
?


Wednesday, January 22, 2014

PHP SOAP and WSDL

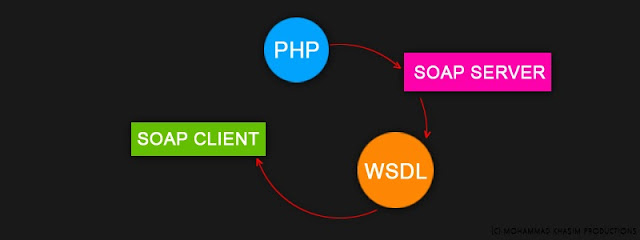
Hi, today i am going to tell you about how to create a SOAP Object with PHP, before that we must know about what is SOAP, a SOAP is ( SIMPLE OBJECT ACCESS PROTOCOL ) which is used for creating a Web Service, the advantage of SOAP is we can communicate with multiple and different operating system and work with multiple programming platforms on HTTP request, we can write the SOAP in XML based language, let's see how to create a simple soap server and soap client using php


What is SOAP SERVER ?

SOAP SERVER
is a Constructor and provide a server to access the WSDL file and you can use this with WSDL or without WSDL service discretion, you can create the soap server in php using new keyword see this code new SoapServer("some.wsdl");

What is SOAP CLIENT ?

SOAP CLIENT
 is a Constructor and provide a client to access the WSDL file and you can use this with WSDL or without WSDL service discretion, you can create the soap client in php using new keyword see this code new SoapClient ("some.wsdl"); 

What is WSDL ?

WSDL is Web service Description Language and it is written in XML based language to describe the web services, it is a place where we write the php function names to access the SoapServer and in same wsdl file we also use the php file name with that wsdl file access the given function from php file, see the bellow XML code which i have wrote to access the users data from database
?
1
2
3
4
5
6
7
8
9
10
11
12
13
14
15
16
17
18
19
20
21
22
23
24
25
26
27
28
29
30
31
32
33
34
35
36
37
38
39
40
41
42
43
xml version ='1.0' encoding ='UTF-8' ?>
<definitions name='Users'
<message name='getUsersRequest'>
  <part name='symbol' type='xsd:string'/>
</message>
<message name='getUsersResponse'>
  <part name='Result' type='xsd:string'/>
</message>
<portType name='UsersPortType'>
  <operation name='getUsers'>
    <input message='tns:getUsersRequest'/>
    <output message='tns:getUsersResponse'/>  
  </operation>
</portType>
<binding name='UsersBinding' type='tns:UsersPortType'>
  <soap:binding style='rpc' transport='http://schemas.xmlsoap.org/soap/http'/>
  <operation name='getUsers'>
    <soap:operation soapAction='urn:localhost'/>
    <input>
      <soap:body use='encoded' namespace='urn:localhost' encodingStyle='http://schemas.xmlsoap.org/soap/encoding/'/>
    </input>
    <output>
      <soap:body use='encoded' namespace='urn:localhost' encodingStyle='http://schemas.xmlsoap.org/soap/encoding/'/>
    </output>
  </operation>     
</binding>
<service name='UsersService'>
  <port name='UsersPort' binding='UsersBinding'>
    <soap:address location='http://demos.pixelmax.in/soapandwsdl/users.php'/>
  </port>
</service>
</definitions>

users.php (Creating Soap Server)

in this file create the function and write the query to fetch the users data from database and using json_encode() method convert the php array to json object,  remind when ever you work with soap and wsdl you must set the cache of wsdl in server using ini_set("soap.wsdl_cache_enabled","0");

now create the Soap Server using new SoapServer('users.wsdl') and keep the wsdl file inside the constructor now we need to provide the function name to Soap Client with that the client access the data, use addFunction("getUsers") method it is predefined function of SOAP Class and inside the function assign the php function name like getUsers, now use handle() method to handle the SOAP request
?
1
2
3
4
5
6
7
8
9
10
11
12
13
14
15
16
17
18
19
20
21
22
23
24
25
26
27
28
29
include('db.php');
function getUsers(){
   $ss= mysql_query("select * from users");
   $data = array();
    
   while ($row=mysql_fetch_array($ss)){
    
   $data[] = $row['uid'] . " " . $row['username'] . " " . $row['email'] . " " . $row['gender'].'
';
   $fabdata = json_encode($data);
   }
    
   return $fabdata;
  
}
ini_set("soap.wsdl_cache_enabled","0");
$server = new SoapServer("users.wsdl");
$server->AddFunction("getUsers");
$server->handle();
?>

index.php (Creating Soap Client)

here first turn off the wsdl cache, now create the soap client using new SoapClient("users.wsdl") and give the wsdl file inside the function now call the function name which is written in users.wsdl file like getUsers() now decode the JSON encoded data which is coming from function using json_decode() method, now just print or loop the elements you can able to see the result..
?
1
2
3
4
5
6
7
8
9
10
11
12
13
14
15
16
17
// turn off the WSDL cache
ini_set ("soap.wsdl_cache_enabled", "0");
$client = new SoapClient("users.wsdl");
$us = $client->getUsers();
$users= (array) json_decode($us);
while (list($key, $val) = each($users)) {
echo "$key => $val\n";
}
?>
- See more at: http://www.lessoncup.com/2013/12/php-soap-and-wsdl.html#sthash.O103TUeA.dpuf

JSON Introduction

Now a days, JSON has become a hot topic. Developers today are really getting interesting in JSON.

So, in this post I am going to explain what is JSON.

JSON : JavaScript Object Notation  is a technology / format to store the data in key - value pairs i.e. the large amount of data can be stored / transmit using a JSON.

Like for example : For a php developer, it is common to create the AJAX backend page and to send the data back to main page. Previously it was kind of tedious as user needs to create an array and needs to handle everything by himself / herself. But with JSON, it becomes very easy. JUST CREATE A JSON OBJECT containing the data, pass it to main page and use it.. simple.

and this is just a very basic example.

JSON is widely used in all Documents-Oriented Databases (like MongoDB[http://learnandsharetoall.blogspot.in/2014/01/what-is-mongodb.html], Hadoop, NoSQL etc.).
So JSON's application is very very much extended.

Now to understand JSON, lets divide it in four parts.

a) Basic Structure
b) Value Types
c) Complex Structures 

So Basic Structure, a basic JSON script contains a "KEY-VALUE" pair to represent the data.
for example

{
   "name" : "test",
   "country" : "India"
}

So above is the basic JSON script.
Starting and ending the script with curly braces {  and  and then key-value pairs separated by comma

Above name and country is key with values test and India.

So this is basic JSON structure, how a basic JSON looks like.


Moving on to value types , i.e. what are the types of values it can store.

So consider the below JSON,
{
     "name " : "Test1",
      "Age " : 22,
     "isMarried" : false
}


So the above JSON has 3 value pairs, name with String value, Age with Integer value and isMarried with boolean values.

So as we have seen, the JSON can store a wide variety of data.
Even the key in JSON can serve as individual JSON  Script and can also hold array of objects.(described in complex structure part)

Moving on to Complex Structures,

There can be two types of complex structures as told above.
a) Keys containing array of objects
b) Keys containing another JSON script(nested JSON)


Keys containing Array

Consider a JSON,
{
    "name  " : "test1",
    " country " : "india",
    "hobbies " : ["Music","Reading" , "Blah" , " Blah"]

}

So here a key hobbies containing an array of objects.So this, can be used to store the array of values.This can be really useful in real world applications.

Keys containing another JSON script(nested JSON)

Consider a JSON,
{
       " name " : "test1",
        "address" : {
                             "city" : "Noida",
                             "country" : "India"
                        }
        "DOB" : "28-feb"
}

So in above script,
address is the key which itself is the json object.

You can use these as


var s = {

       "name" : "test1",

        "address" : {

                             "city" : "Noida",

                             "country" : "India"

                        },

        "DOB" : "28-feb"

}

console.log(s.address);
   // This will print the address JSON

To get the city  console.log(s.address.city);

Combining the above two complex structure, we can create a JSON which contains key having arrays of JSON String.


Hope it helps.

Tuesday, January 21, 2014

Login with Google Account to Website

This post have Complete Code for Login with google Account .(For PHp Developers)

Basically today we have seen almost every website needs you to register yourself before you can post or take part in any discussions to the website. But it become a tedious task to register and login to many different sites. Solution is to provide the users the option to Login with existing Google / Facebook account as almost everyone have Facebook and Google account.

In this post, I am going to explain how to integrate the Google Login in your website.

Download Source Code

Live Demo

For this,  First you need to create your Client ID, Client Secret and your developer API key.

For this go to https://code.google.com/apis/console/
                         

Just click on Create Project.

You should get a screen like this,:


 Click on the 1st Red Button [Create New CLIENT ID] ,.
Select Web Application(Assuming you are using this for Web Application)
Fill URL under

Authorized Javascript origins 

and 

Authorized redirect URI 

and click create Create Client ID button.
You should see Client ID and Client Secret like this..
Now Client ID and client Key is successfully generated. To generate Developer API Key.

Click Create New Key, on the below screen.


On clicking you will see, Click Browser Key


.Enter your website URL and click "Create". The API developer key is generated.

You should see a window like this.


Once you have done this, lets look towards code,

We have file google_verification.php, holds information about the keys genrated.
Then we have a Google Client Libary for PHP(src folder) downloable from

https://code.google.com/p/google-api-php-client/downloads/list

Then we have file index.php interacting with Google Client Libraay and generating User Information.

i have not integarted Database part in this post as this is the easy part and  I dint want the code to be complex because of that part.
Although in code, I  have made suitable comments to help you understand the code and also made comments for what to be done for database connection.

 Thats it...Hope this will help.

If you like the Post, please share on facebook and google.

Thanks,

Followers